マテリアルテーマのボタンのUI[modern]
modernのテーマには、theme-materialを指定することでマテリアルデザインにできますが、ボタンのUIが通常のテーマとは若干異なります。
ボタンのuiコンフィグに指定できるのは、次のようなものになります。
Ext.define('Sample.view.main.Form', {
    extend: 'Ext.form.Panel',
    xtype: 'main_form',

    requires: [
        'Ext.Button'
    ],

    cls: 'main-form',

    scrollable: true,

    defaults: {
        margin: '0 0 15 0'
    },

    items: [
        {
            xtype: 'button',
            text: 'action',
            ui: 'action'
        },
        {
            xtype: 'button',
            text: 'alt',
            ui: 'alt'
        },
        {
            xtype: 'button',
            text: 'confirm',
            ui: 'confirm'
        },
        {
            xtype: 'button',
            text: 'decline',
            ui: 'decline'
        },
        {
            xtype: 'button',
            text: 'raised',
            ui: 'raised'
        },
        {
            xtype: 'button',
            text: 'raised-confirm',
            ui: 'raised-confirm'
        },
        {
            xtype: 'button',
            text: 'raised-decline',
            ui: 'raised-decline'
        },
        {
            xtype: 'button',
            text: 'segmented',
            ui: 'segmented'
        },
        {
            xtype: 'button',
            iconCls: 'md-icon-add',
            ui: 'fab'
        },
        {
            xtype: 'button',
            text: 'mybutton1',
            ui: 'mybutton1'
        },
        {
            xtype: 'button',
            text: 'mybutton2',
            ui: 'mybutton2'
        }
    ]
});
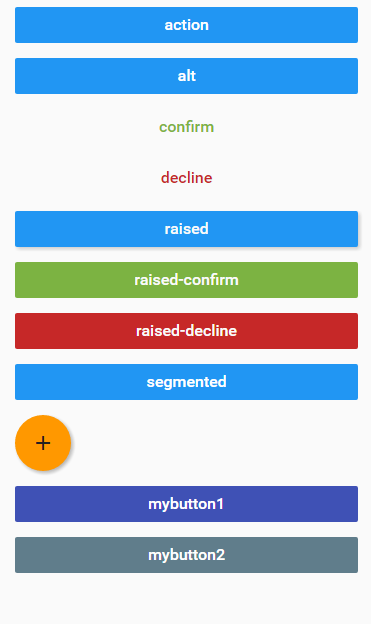
fabまでは標準で用意されているUIです。
mybutton1とmybutton2は追加してみました。
.#{$prefix}button {
  text-transform: inherit !important;
}

$mybutton1-color-name: dynamic('indigo');
$mybutton1-color: dynamic(material-color('indigo', '500'));
$mybutton1-foreground-color: dynamic(material-foreground-color($mybutton1-color-name));
$mybutton1-pressed-color: dynamic(rgba($mybutton1-color, .8));

@include button-ui(
    $ui: 'mybutton1',
    $color: $mybutton1-foreground-color,
    $background-color: $mybutton1-color,
    $pressed-background-color: $mybutton1-pressed-color
);

$mybutton2-color: dynamic(#607D8B);
$mybutton2-foreground-color: dynamic(#ffffff);
$mybutton2-pressed-color: dynamic(rgba($mybutton2-color, .8));

@include button-ui(
    $ui: 'mybutton2',
    $color: $mybutton2-foreground-color,
    $background-color: $mybutton2-color,
    $pressed-background-color: $mybutton2-pressed-color
);
ext/modern/theme-material/sass/var/Button.scss を見るとどのようにuiが定義されているかを追うことができると思います。
'indigo'はtheme-materialであらかじめ用意されている色で、ext/modern/theme-material/sass/etc/functions/color.scss に定義してあります。
マテリアルデザインの色については、 https://material.io/guidelines/style/color.html#color-color-palette が役に立つと思います。
バリデーション:classicのようにエラーテキストを画面に表示させる[modern]
※ExtJS6.5.0からmodernのエラー表示の機能が強化され、標準機能で実現できるようになっています。
modernの場合、標準で提供されている入力エラーの表示方法が乏しいです。
でも画面にも表示できたほうがUIとしては良いので、エラーテキストを入力フィールドの下に表示させてみました。
Ext.field.Textをオーバーライド
まずはエラーテキストを表示するための機能を、オーバーライドで追加しました。
/**
 * テキストフィールドのオーバーライドクラス。
 *
 * @class Sample.overrides.field.Text
 * @override Ext.field.Text
 */
Ext.define('Sample.overrides.field.Text', {
    override: 'Ext.field.Text',

    /**
     * @cfg {String} エラー時に付与されるセレクタ名。
     */
    errorCls: Ext.baseCSSPrefix + 'has-error',

    // @override
    getElementConfig: function() {
        return {
            reference: 'element',
            children: [
                {
                    reference: 'labelElement',
                    cls: Ext.baseCSSPrefix + 'label-el',
                    children: [{
                        reference: 'labelTextElement',
                        cls: Ext.baseCSSPrefix + 'label-text-el',
                        tag: 'span'
                    }]
                },
                {
                    reference: 'bodyElement',
                    cls: Ext.baseCSSPrefix + 'body-el'
                },
                {
                    reference: 'errorElement',
                    cls: Ext.baseCSSPrefix + 'error-el'
                }
            ]
        };
    },

    /**
     * エラーをマークする。
     * @param {String|Array} messages エラーメッセージ
     */
    markInvalid: function (messages) {
        var me = this,
            errorElement = me.errorElement;

        if (Ext.isString(messages)) {
            messages = [messages];
        }

        if (messages.length > 0) {
            me.addCls(me.errorCls);
        }

        errorElement.setHtml(messages.join('<br>'));
    },

    /**
     * エラーをクリアする。
     */
    clearInvalid: function () {
        var me = this,
            errorElement = me.errorElement;

        me.removeCls(me.errorCls);

        errorElement.setHtml(null);
    }
});

@charset "UTF-8";

.x-textfield {
  &.x-has-error {
    color: #c00;

    .x-input {
      border-color: #c00;
    }
  }
}
getElementConfigメソッドのオーバーライドで、エラーテキストの表示要素を用意し、エラーの表示・クリアのメソッドを追加しました。
これでmarkInvalidメソッドを呼び出すことでエラーテキストを表示できます。
モデル
/**
 * ユーザモデルクラス。
 *
 * @class Sample.model.User
 * @extend Ext.data.Model
 */
Ext.define('Sample.model.User', {
    extend: 'Ext.data.Model',

    fields: [
        {
            name: 'name',
            type: 'string'
        },
        {
            name: 'kana',
            type: 'string'
        },
        {
            name: 'gender',
            type: 'string'
        },
        {
            name: 'age',
            type: 'int'
        },
        {
            name: 'postalCode',
            type: 'string'
        },
        {
            name: 'address',
            type: 'string'
        },
        {
            name: 'note',
            type: 'string'
        }
    ],

    validators: {
        name: [
            {
                type: 'presence'
            },
            {
                type: 'length',
                max: 10
            }
        ],
        kana: [
            {
                type: 'length',
                max: 10
            }
        ],
        gender: 'presence',
        age: [
            {
                type: 'range',
                min: 0
            }
        ]
    }
});
ビュー
/**
 * メインパネル。
 *
 * @class Sample.view.main.Panel
 * @extend Ext.Panel
 */
Ext.define('Sample.view.main.Panel', {
    extend: 'Ext.Panel',
    xtype: 'main_panel',

    requires: [
        'Sample.view.main.Form',
        'Sample.view.main.ViewController',
        'Sample.view.main.ViewModel'
    ],

    controller: 'main',
    viewModel: 'main',

    layout: 'fit',

    items: {
        reference: 'form',
        xtype: 'main_form'
    },

    listeners: {
        show: 'onShow'
    }
});

/**
 * ユーザ登録フォームクラス。
 *
 * @class Sample.view.main.Form
 * @extend Ext.form.Panel
 */
Ext.define('Sample.view.main.Form', {
    extend: 'Ext.form.Panel',
    xtype: 'main_form',

    requires: [
        'Ext.field.Text',
        'Ext.field.Select',
        'Ext.field.Number',
        'Ext.field.TextArea',
        'Ext.Button'
    ],

    cls: 'main-form',

    title: 'ユーザ登録',

    scrollable: true,

    bind: {
        record: '{user}'
    },

    items: [
        {
            xtype: 'textfield',
            name: 'name',
            label: '氏名'
        },
        {
            xtype: 'textfield',
            name: 'kana',
            label: 'かな'
        },
        {
            xtype: 'selectfield',
            name: 'gender',
            label: '性別',
            autoSelect: false,
            options: [
                {
                    text: '男性',
                    value: '1'
                },
                {
                    text: '女性',
                    value: '2'
                }
            ]
        },
        {
            xtype: 'numberfield',
            name: 'age',
            label: '年齢'
        },
        {
            xtype: 'textfield',
            name: 'postalCode',
            label: '郵便番号'
        },
        {
            xtype: 'textfield',
            name: 'address',
            label: '住所'
        },
        {
            xtype: 'textareafield',
            name: 'note',
            label: '備考'
        },
        {
            xtype: 'button',
            text: '保存',
            handler: 'onClickSaveButton'
        }
    ]

});

/**
 * ビューコントローラクラス。
 *
 * @class Sample.view.main.ViewController
 * @extend Ext.app.ViewController
 */
Ext.define('Sample.view.main.ViewController', {
    extend: 'Ext.app.ViewController',
    alias: 'controller.main',

    /**
     * showイベント時の処理。
     */
    onShow: function () {
        var me = this,
            user = Ext.create('Sample.model.User');

        me.getViewModel().set('user', user);
    },

    /**
     * 保存ボタンクリック時の処理。
     */
    onClickSaveButton: function () {
        var me = this,
            form = me.lookupReference('form');

        if (me.isValid()) {
            // MEMO: エラーがない場合の処理を記述
        } else {
            Ext.Msg.alert('エラー', '入力エラーの箇所があります');
        }
    },

    /**
     * 入力チェック。
     * @returns {boolean} エラー箇所が無い場合はtrue
     */
    isValid: function () {
        var me = this,
            form = me.lookupReference('form'),
            user = form.getRecord(),
            validation,
            firstInvalidField;

        // 一旦エラー表示をクリア
        Ext.each(form.query('field'), function (field) {
            if (Ext.isFunction(field.clearInvalid)) {
                field.clearInvalid();
            }
        });

        user.set(form.getValues());

        validation = user.getValidation();

        if (validation.dirty) {
            Ext.Object.each(validation.data, function (k, v) {
                if (Ext.isString(v)) {
                    var field = form.down('field[name="' + k + '"]');

                    if (field) {
                        field.markInvalid(v);

                        if (!firstInvalidField) {
                            // TODO: 先頭フィールドにフォーカスさせようとしているが、これだと保障されないかも
                            firstInvalidField = field;
                        }
                    }
                }
            });

            if (firstInvalidField) {
                firstInvalidField.focus();
            }

            return false;
        } else {
            return true;
        }
    }
});

/**
 * ビューモデルクラス。
 *
 * @class Sample.view.main.ViewModel
 * @extend Ext.app.ViewModel
 */
Ext.define('Sample.view.main.ViewModel', {
    extend: 'Ext.app.ViewModel',
    alias: 'viewmodel.main',

    data: {
        /**
         * @cfg {Sample.model.User} ユーザモデル
         */
        user: null
    }
});
バリデーションチェック自体は、モデルのgetValidationメソッドを使った基本通りで、エラーがある場合に、オーバーライドで追加したメソッドを呼び出すようにしています。
面倒になって一部手抜きになっていますが、今回の趣旨とは違うところなのでまあいいかな。あと、おそらくビューコントローラのisValidメソッドは共通化できそう。
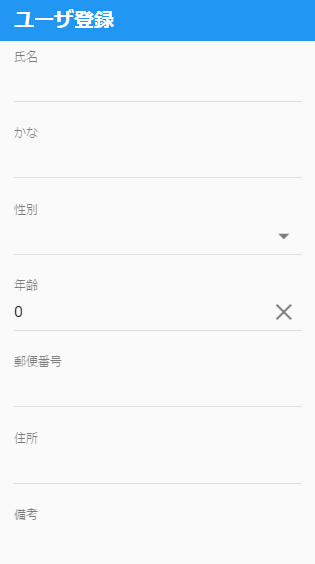
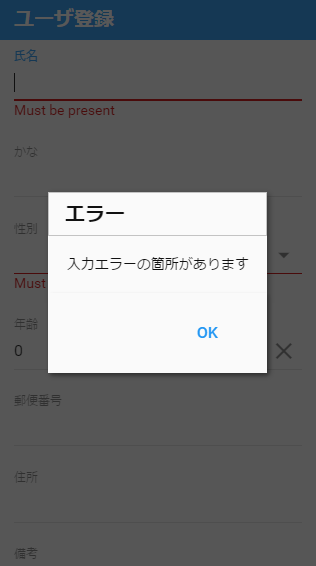
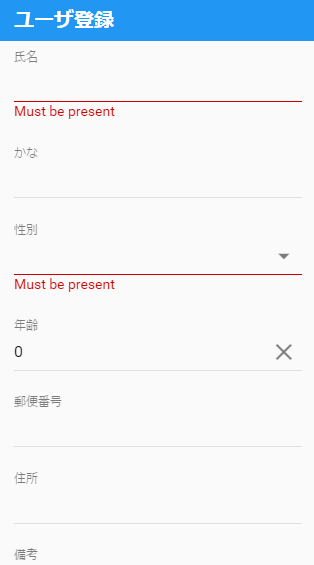
なかなか良い感じになりました。
独自バリデーションをExt.form.field.VTypesに追加する[classic]
よく使うようなバリデーションチェックは、Ext.form.field.VTypesに追加しておくと便利です。
追加したバリデーションは、alphaなどのようにvtypeで使えるようになります。
Ext.form.field.VTypesのオーバーライド
オーバーライドクラスには、最低限、バリデーションチェックとエラーメッセージを追加する必要があります。
/**
 * Ext.form.field.VTypesのオーバーライドクラス。
 *
 * @class Sample.overrides.form.field.VTypes
 * @override Ext.form.field.VTypes
 */
Ext.define('Sample.overrides.form.field.VTypes', {
    override: 'Ext.form.field.VTypes',

    hiragana: function(v) {
        return /^[ぁ-んー ]*$/.test(v);
    },

    hiraganaText: '平仮名で入力してください。'
});
バリデーションチェック用のメソッド名が、vtypeに指定する文字列となります。上記のコードの場合はhiraganaです。
エラーメッセージは、vtypeの文字列に"Text"を付与したプロパティ名にします。上記コードの場合は、hiraganaTextです。
使ってみよう
実際に組み込んでみます。
/**
 * 商品登録フォームクラス。
 *
 * @class Sample.view.main.Form
 * @extend Ext.form.Panel
 */
Ext.define('Sample.view.main.Form', {
    extend: 'Ext.form.Panel',
    xtype: 'main_form',

    bodyPadding: 20,

    defaults: {
        anchor: '100%',
        labelAlign: 'top',
        labelSeparator: '',
        msgTarget: 'under'
    },

    items: [
        {
            xtype: 'textfield',
            fieldLabel: '氏名'
        },
        {
            xtype: 'textfield',
            fieldLabel: 'かな',
            vtype: 'hiragana'
        }
    ]
});


期待通りの動作をしました。
バリデーションチェックの部分は、正規表現を駆使すれば色々なチェックができます。ただし、他の入力フィールドの値に応じて動的にチェックが変わるような複合チェックは無理なので、そういう場合はvalidatorを使うようにしましょう。
バリデーションチェック[classic]
今回はclassicのバリデーションチェックです。
入力フィールドの種類にも依りますが、基本的には↓の方法になると思います。
http://docs.sencha.com/extjs/6.2.1/classic/Ext.form.field.Text.html#ext-form-field-text_validation
今回は、特にvtypeとvalidatorについて取り上げます。
vtype
vtypeコンフィグには、Ext.form.field.VTypesであらかじめ用意されているバリデーションを指定できます。
あらかじめ用意されているバリデーションとしては、↓のようなものがあります。
- alpha 半角英字チェック。
- alphanum 半角英数チェック。
- email メールアドレス形式チェック。
- url URL形式チェック。
emailを試してみると↓のようになります。
Ext.define('Sample.view.main.Form', {
    extend: 'Ext.form.Panel',
    xtype: 'main_form',

    bodyPadding: 20,

    defaults: {
        anchor: '100%',
        labelAlign: 'top',
        labelSeparator: '',
        msgTarget: 'under'
    },

    items: [
        {
            xtype: 'textfield',
            fieldLabel: 'メールアドレス',
            vtype: 'email'
        }
    ]
});
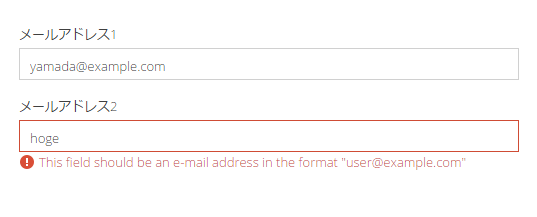
validator
汎用的でない判定が必要な場合は、validatorコンフィグを使います。
Ext.define('Sample.view.main.Form', {
    extend: 'Ext.form.Panel',
    xtype: 'main_form',

    bodyPadding: 20,

    defaults: {
        anchor: '100%',
        labelAlign: 'top',
        labelSeparator: '',
        msgTarget: 'under'
    },

    items: [
        {
            xtype: 'checkbox',
            name: 'needMailMagazine',
            fieldLabel: 'メルマガ購読',
            boxLabel: '購読する'
        },
        {
            xtype: 'textfield',
            fieldLabel: 'メールアドレス',
            validator: function () {
                var form = this.up('form'),
                    needMailMagazine = form.down('checkbox[name="needMailMagazine"]').checked;

                if (needMailMagazine && !this.getValue()) {
                    return Ext.form.field.Text.prototype.blankText;
                } else {
                    return true;
                }
            }
        }
    ]
});

↑のようにvalidatorに関数を渡して、エラーがある場合はエラー内容の文字列を、エラーが無い場合はtrueを返すようにします。
この例では、メルマガ購読がONの場合にはメールアドレスが入力されているかをチェックするようにしています。
(本当に実装する場合は、おそらくビューモデルを使ってチェックボックスのON/OFFに合わせて、メールアドレスの非活性を切り替えるでしょう)
グリッドの機能:サマリー[modern]
今回はグリッドのサマリー機能です。classicと同じように、グリッドの列の平均や合計を表示する行を追加できます。
サマリー表示にはExt.grid.plugin.SummaryRowプラグインクラスを使います。残念ながらドキュメントが全く整備されていませんでした(http://docs.sencha.com/extjs/6.2.1/modern/Ext.grid.plugin.SummaryRow.html)。classicと同じだからドキュメント整備を後回しにしたのかな?
ストアとモデル
以前使ったものを流用しました。
/**
 * 注文モデルクラス。
 *
 * @class Sample.model.Order
 * @extend Ext.data.Model
 */
Ext.define('Sample.model.Order', {
    extend: 'Ext.data.Model',

    fields: [
        {
            // ID
            name: 'id',
            type: 'int'
        },
        {
            // 商品名
            name: 'name',
            type: 'string'
        },
        {
            // 会社
            name: 'company',
            type: 'string'
        },
        {
            // 金額(単価)
            name: 'price',
            type: 'int'
        },
        {
            // 数量
            name: 'num',
            type: 'int'
        },
        {
            // 売上金額
            name: 'total',
            convert: function (value, record) {
                return record.get('price') * record.get('num');
            },
            depends: [
                'price',
                'num'
            ]
        },
        {
            // 作成日時(注文日時)
            name: 'created',
            type: 'date',
            dateFormat: 'Y/m/d H:i:s'
        }
    ]

});

/**
 * 注文ストアクラス。
 *
 * @class Sample.store.Order
 * @extend Ext.data.Store
 */
Ext.define('Sample.store.Order', {
    extend: 'Ext.data.Store',
    alias: 'store.order',

    requires: [
        'Ext.data.proxy.LocalStorage',
        'Sample.model.Order'
    ],

    model: 'Sample.model.Order',

    proxy: {
        type: 'localstorage',
        id: 'order'
    }

});
ビュー
グリッドにプラグインを組み込みます。
/**
 * 注文一覧グリッドクラス。
 *
 * @class Sample.view.main.List
 * @extend Ext.grid.Grid
 */
Ext.define('Sample.view.main.List', {
    extend: 'Ext.grid.Grid',
    xtype: 'main_list',

    requires: [
        'Ext.grid.column.Number',
        'Ext.grid.plugin.SummaryRow'
    ],

    cls: 'main-list',

    title: '注文一覧',

    store: {
        type: 'order',
        autoLoad: true
    },

    plugins: {
        type: 'summaryrow'
    },

    columns: [
        {
            dataIndex: 'name',
            text: '商品名',
            minWidth: 300,
            flex: 1
        },
        {
            xtype: 'numbercolumn',
            format: '0,000円',
            dataIndex: 'total',
            text: '売上金額',
            align: 'right',
            width: 300,
            summaryType: 'sum',
            summaryRenderer: function (value) {
                return '合計金額:' + Ext.util.Format.currency(value, '円', 0, true);
            }
        }
    ]
});
サマリー行のスタイルが何もしてない状態だったので、少し整えました。
@charset "UTF-8";

.main-list {
  .x-summaryrow {
    background-color: #eee;

    .x-summarycell {
      padding: 0.875em 1em;
    }
  }
}
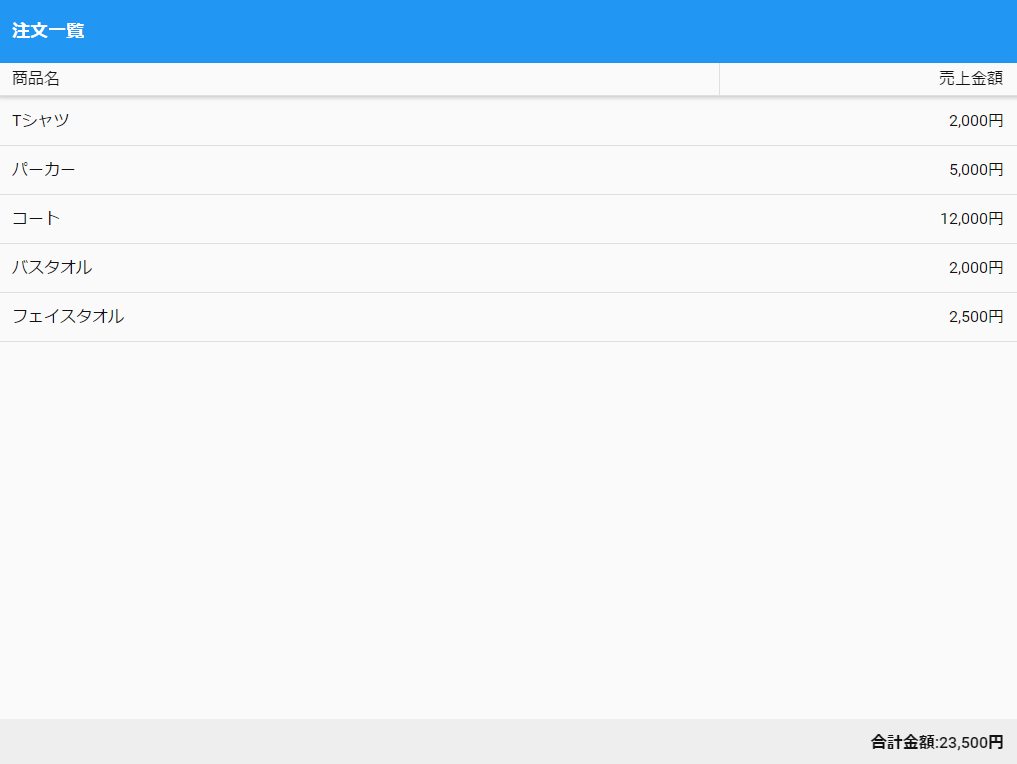
classicと同じように、summaryTypeとsummaryRendererを使います。
summaryTypeにはcount、sum、min、max、averageが設定できます。
プラグインのdockedコンフィグで行の位置を変えれます。
plugins: {
    type: 'summaryrow',
    docked: 'top'
}
グリッドの機能紹介は今回で終わりです。
グリッドの機能:ページング[modern]
modernのグリッドでページングしてみます。
Ext.grid.plugin.PagingToolbarを使ってページング用のツールバーを設置します。classicの場合はコンポーネントでしたが、modernの場合はプラグインになっています。
ストア
まずはストアですが、これはclassicと同じです(enablePaging, pageSizeを設定)。
/**
 * 商品ストアクラス。
 *
 * @class Sample.store.Item
 * @extend Ext.data.Store
 */
Ext.define('Sample.store.Item', {
    extend: 'Ext.data.Store',
    alias: 'store.item',

    requires: [
        'Ext.data.proxy.Memory',
        'Sample.model.Item'
    ],

    model: 'Sample.model.Item',

    pageSize: 5,

    proxy: {
        type: 'memory',
        enablePaging: true
    },

    data: [
        { id: 1, name: '商品1', price: 1000, isActive: true, created: new Date() },
        { id: 2, name: '商品2', created: new Date() },
        { id: 3, name: '商品3', created: new Date() },
        { id: 4, name: '商品4', created: new Date() },
        { id: 5, name: '商品5', created: new Date() },
        { id: 6, name: '商品6', created: new Date() },
        { id: 7, name: '商品7', created: new Date() },
        { id: 8, name: '商品8', created: new Date() },
        { id: 9, name: '商品9', created: new Date() },
        { id: 10, name: '商品10', created: new Date() },
        { id: 11, name: '商品11', created: new Date() },
        { id: 12, name: '商品12', created: new Date() },
        { id: 13, name: '商品13', created: new Date() },
        { id: 14, name: '商品14', created: new Date() },
        { id: 15, name: '商品15', created: new Date() },
        { id: 16, name: '商品16', created: new Date() },
        { id: 17, name: '商品17', created: new Date() },
        { id: 18, name: '商品18', created: new Date() },
        { id: 19, name: '商品19', created: new Date() },
        { id: 20, name: '商品20', created: new Date() }
    ]

});
プラグインを組み込む
次にExt.grid.plugin.PagingToolbarを組み込みます。
/**
 * 商品一覧グリッドクラス。
 *
 * @class Sample.view.main.List
 * @extend Ext.grid.Grid
 */
Ext.define('Sample.view.main.List', {
    extend: 'Ext.grid.Grid',
    xtype: 'main_list',

    requires: [
        'Ext.grid.column.Number',
        'Ext.grid.column.Boolean',
        'Ext.grid.column.Date',
        'Ext.grid.plugin.PagingToolbar'
    ],

    title: '商品一覧',

    store: 'Item',

    plugins: {
        type: 'pagingtoolbar'
    },

    columns: [
        {
            dataIndex: 'id',
            text: 'ID',
            align: 'right'
        },
        {
            dataIndex: 'name',
            text: '商品名',
            minWidth: 300,
            flex: 1
        },
        {
            xtype: 'numbercolumn',
            format:'0,000円',
            dataIndex: 'price',
            text: '金額',
            align: 'right'
        },
        {
            xtype: 'booleancolumn',
            dataIndex: 'isActive',
            text: '有効状況',
            trueText: '有効',
            falseText: '無効',
            align: 'center'
        },
        {
            xtype: 'datecolumn',
            format: 'Y/m/d H:i',
            dataIndex: 'created',
            text: '登録日時',
            width: 180
        }
    ]
});
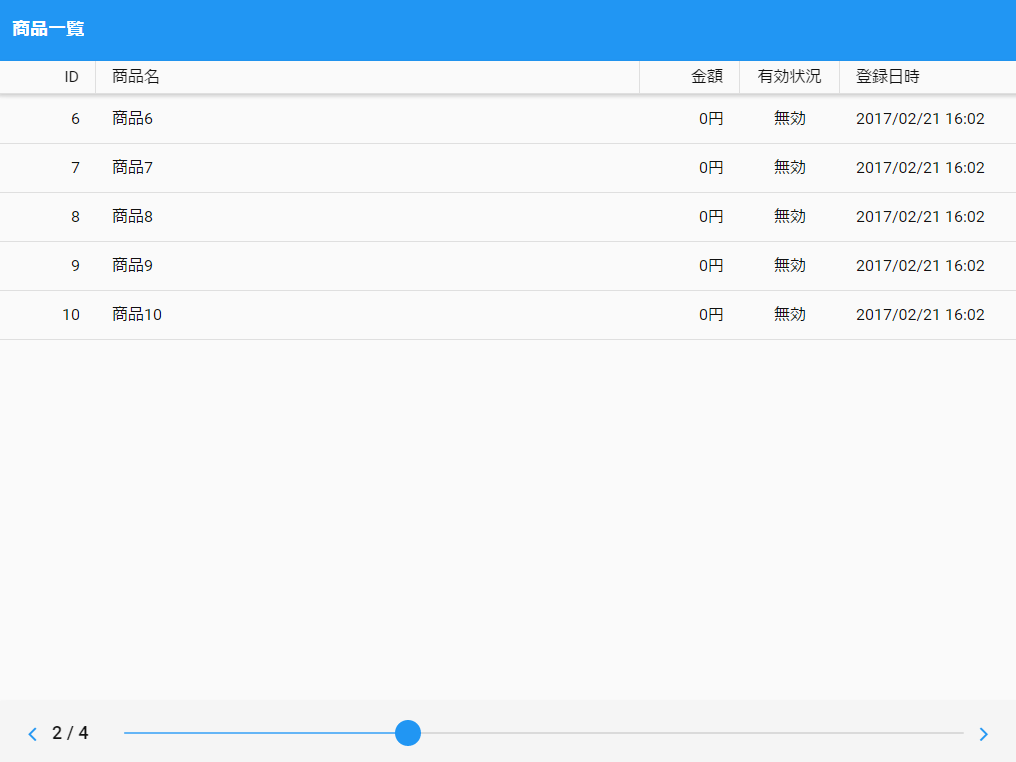
プラグインを組み込むと、グリッドの下部にツールバーが設置されます。指でツールバーの●をぐいっと移動してページを変更できます。
非常にあっさりとしたツールバーですが、タップ操作ならこれぐらいで十分なのでしょう。
グリッドの機能:編集[modern]
今回はmodernのグリッド編集を試しました。
とりあえず編集できるようにする
Ext.grid.plugin.Editableが用意されていたので、まずは1カラムだけ編集するようにしてみました。
/**
 * 商品一覧グリッドクラス。
 *
 * @class Sample.view.main.List
 * @extend Ext.grid.Grid
 */
Ext.define('Sample.view.main.List', {
    extend: 'Ext.grid.Grid',
    xtype: 'main_list',

    requires: [
        'Ext.grid.column.Number',
        'Ext.grid.column.Check',
        'Ext.grid.column.Date',
        'Ext.grid.plugin.Editable'
    ],

    title: '商品一覧',

    store: 'Item',

    plugins: 'grideditable',

    columns: [
        {
            dataIndex: 'id',
            text: 'ID',
            align: 'right'
        },
        {
            dataIndex: 'name',
            text: '商品名',
            minWidth: 300,
            flex: 1,
            editable: true
        },
        {
            xtype: 'numbercolumn',
            format:'0,000円',
            dataIndex: 'price',
            text: '金額',
            align: 'right'
        },
        {
            xtype: 'checkcolumn',
            dataIndex: 'isActive',
            text: '有効状況',
            sortable: false
        },
        {
            xtype: 'datecolumn',
            format: 'Y/m/d H:i',
            dataIndex: 'created',
            text: '登録日時',
            width: 180
        }
    ]
});
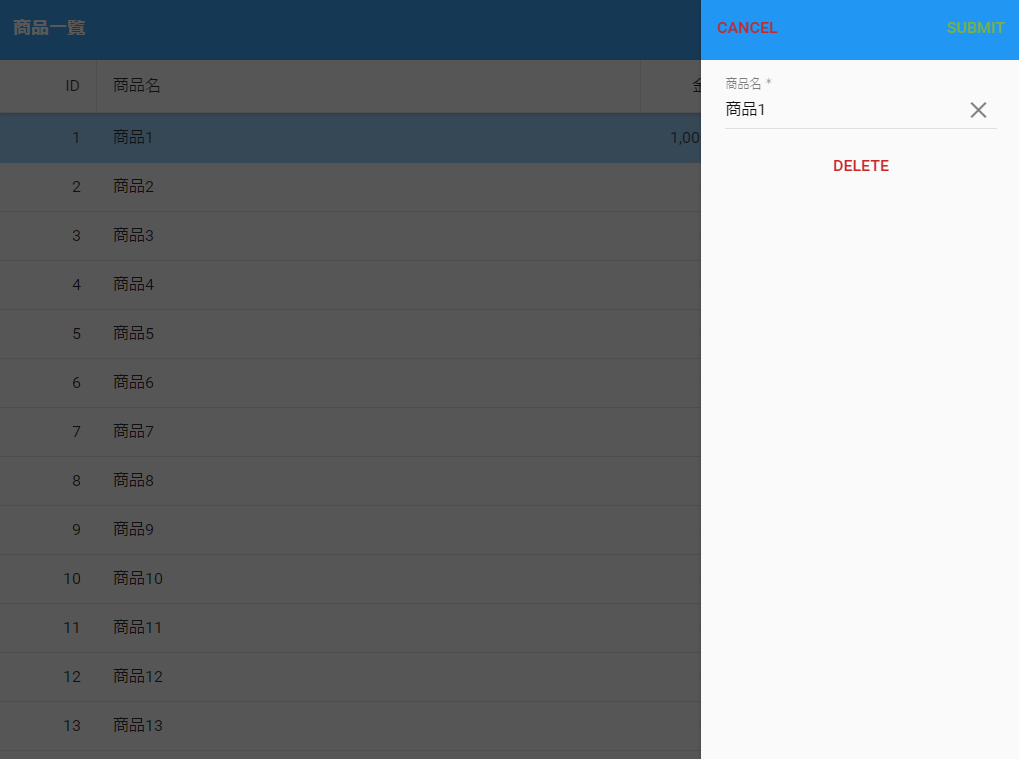
行をダブルタップすると、↑のように編集用のシートが画面右側からスライドインします。
editable: trueとしたカラムだけ、入力フィールドが用意されるようです。
もう少し細かく設定する
もう少し編集シートをカスタマイズしてみました。
/**
 * 商品一覧グリッドクラス。
 *
 * @class Sample.view.main.List
 * @extend Ext.grid.Grid
 */
Ext.define('Sample.view.main.List', {
    extend: 'Ext.grid.Grid',
    xtype: 'main_list',

    requires: [
        'Ext.grid.column.Number',
        'Ext.grid.column.Boolean',
        'Ext.grid.column.Date',
        'Ext.grid.plugin.Editable'
    ],

    title: '商品一覧',

    store: 'Item',

    plugins: {
        type: 'grideditable',

        defaultFormConfig: {
            xtype: 'formpanel',
            scrollable: true
        },

        formConfig: {
            items: [
                {
                    xtype: 'textfield',
                    name: 'name',
                    label: '商品名'
                },
                {
                    xtype: 'numberfield',
                    name: 'price',
                    label: '金額(円)'
                },
                {
                    xtype: 'togglefield',
                    name: 'isActive',
                    label: '有効状況'
                }
            ]
        },

        toolbarConfig: {
            xtype: 'titlebar',
            docked: 'top',
            items: [
                {
                    xtype: 'button',
                    text: 'キャンセル',
                    align: 'left',
                    action: 'cancel'
                },
                {
                    xtype: 'button',
                    text: '更新',
                    align: 'right',
                    action: 'submit'
                }
            ]
        }
    },

    columns: [
        {
            dataIndex: 'id',
            text: 'ID',
            align: 'right'
        },
        {
            dataIndex: 'name',
            text: '商品名',
            minWidth: 300,
            flex: 1
        },
        {
            xtype: 'numbercolumn',
            format:'0,000円',
            dataIndex: 'price',
            text: '金額',
            align: 'right'
        },
        {
            xtype: 'booleancolumn',
            dataIndex: 'isActive',
            text: '有効状況',
            trueText: '有効',
            falseText: '無効',
            align: 'center'
        },
        {
            xtype: 'datecolumn',
            format: 'Y/m/d H:i',
            dataIndex: 'created',
            text: '登録日時',
            width: 180
        }
    ]
});
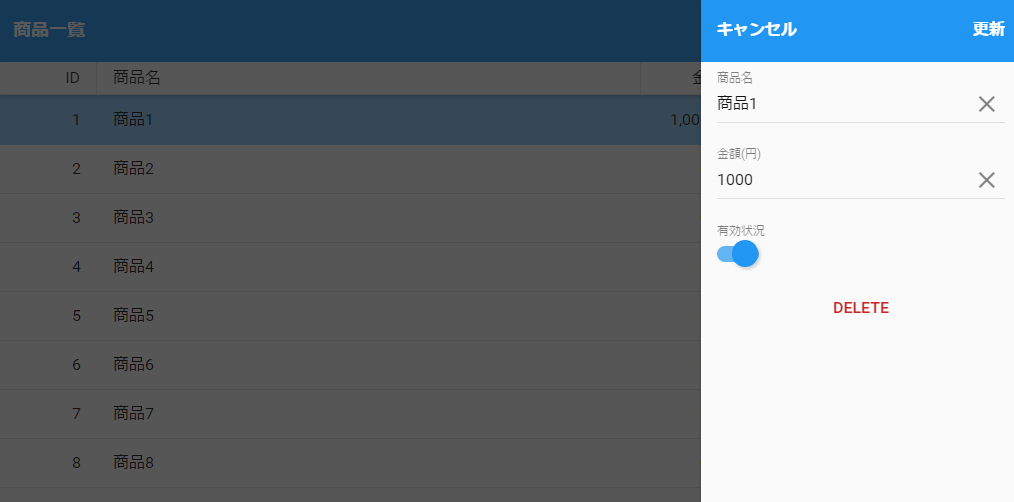
formConfigのitemsコンフィグに入力フィールドを定義することもできるようで、このようにすると、カラムのeditableは不要になるみたいです。
ボタンのテキストを日本語にしてみようと思ったのですが、Ext.grid.plugin.Editableの実装がいけていなくて、DELETEボタンだけは簡単に変更できないようです。
コードを見ると↓のようになっており、textコンフィグに固定文字列が指定されています。
if (me.getEnableDeleteButton()) {
    form.add({
        xtype: 'button',
        text: 'Delete',
        ui: 'decline',
        margin: 10,
        handler: function() {
            grid.getStore().remove(record);
            sheet.hide();
        }
    });
}
オーバーライドクラスで対応
「できません」で終わるのも嫌なので、オーバーライドクラスを作って、その中で対応します。
/**
 * グリッド編集用プラグインクラス。
 *
 * @class Sample.overrides.grid.plugin.Editable
 * @extend Ext.grid.plugin.Editable
 */
Ext.define('Sample.overrides.grid.plugin.Editable', {
    override: 'Ext.grid.plugin.Editable',

    config: {
        /**
         * @cfg {String} 削除ボタンテキスト。
         */
        deleteButtonText: 'DELETE'
    },

    // @override
    onTrigger: function(e) {
        var me = this,
            grid = me.getGrid(),
            formConfig = me.getFormConfig(),
            toolbarConfig = me.getToolbarConfig(),
            record = me.getRecordByTriggerEvent(e),
            fields, form, sheet, toolbar;

        if (record) {
            if (formConfig) {
                this.form = form = Ext.factory(formConfig, Ext.form.Panel);
            } else {
                this.form = form = Ext.factory(me.getDefaultFormConfig());

                fields = me.getEditorFields(grid.getColumns());
                form.down('fieldset').setItems(fields);
            }

            form.setRecord(record);

            toolbar = Ext.factory(toolbarConfig, Ext.form.TitleBar);
            toolbar.down('button[action=cancel]').on('tap', 'onCancelTap', this);
            toolbar.down('button[action=submit]').on('tap', 'onSubmitTap', this);

            this.sheet = sheet = grid.add({
                xtype: 'sheet',
                items: [toolbar, form],
                hideOnMaskTap: true,
                enter: 'right',
                exit: 'right',
                centered: false,
                right: 0,
                width: 320,
                layout: 'fit',
                stretchY: true,
                hidden: true
            });

            if (me.getEnableDeleteButton()) {
                form.add({
                    xtype: 'button',
                    text: me.getDeleteButtonText(),
                    ui: 'decline',
                    margin: 10,
                    handler: function() {
                        grid.getStore().remove(record);
                        sheet.hide();
                    }
                });
            }

            sheet.on('hide', 'onSheetHide', this);

            sheet.show();
        }
    }
});
これで↓のようにdeleteButtonTextを設定します。
/**
 * 商品一覧グリッドクラス。
 *
 * @class Sample.view.main.List
 * @extend Ext.grid.Grid
 */
Ext.define('Sample.view.main.List', {
    extend: 'Ext.grid.Grid',
    xtype: 'main_list',

    requires: [
        'Ext.grid.column.Number',
        'Ext.grid.column.Boolean',
        'Ext.grid.column.Date',
        'Ext.grid.plugin.Editable'
    ],

    title: '商品一覧',

    store: 'Item',

    plugins: {
        type: 'grideditable',

        deleteButtonText: '削除',

        defaultFormConfig: {
            xtype: 'formpanel',
            scrollable: true
        },

        formConfig: {
            items: [
                {
                    xtype: 'textfield',
                    name: 'name',
                    label: '商品名'
                },
                {
                    xtype: 'numberfield',
                    name: 'price',
                    label: '金額(円)'
                },
                {
                    xtype: 'togglefield',
                    name: 'isActive',
                    label: '有効状況'
                }
            ]
        },

        toolbarConfig: {
            xtype: 'titlebar',
            docked: 'top',
            items: [
                {
                    xtype: 'button',
                    text: 'キャンセル',
                    align: 'left',
                    action: 'cancel'
                },
                {
                    xtype: 'button',
                    text: '更新',
                    align: 'right',
                    action: 'submit'
                }
            ]
        }
    },

    columns: [
        {
            dataIndex: 'id',
            text: 'ID',
            align: 'right'
        },
        {
            dataIndex: 'name',
            text: '商品名',
            minWidth: 300,
            flex: 1
        },
        {
            xtype: 'numbercolumn',
            format:'0,000円',
            dataIndex: 'price',
            text: '金額',
            align: 'right'
        },
        {
            xtype: 'booleancolumn',
            dataIndex: 'isActive',
            text: '有効状況',
            trueText: '有効',
            falseText: '無効',
            align: 'center'
        },
        {
            xtype: 'datecolumn',
            format: 'Y/m/d H:i',
            dataIndex: 'created',
            text: '登録日時',
            width: 180
        }
    ]
});
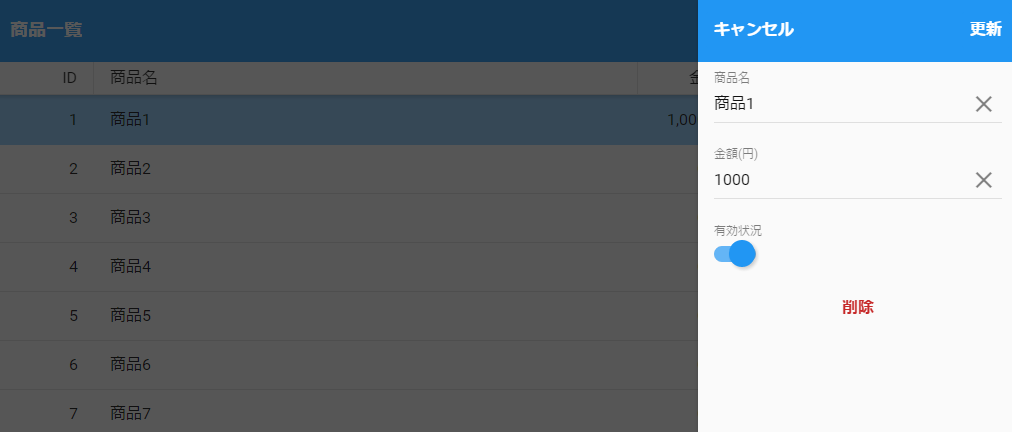
こういう対応はExtJSあるあるです。